Magento A2000 Fashion ERP Integration Guide
Introduction
Magento A2000 Fashion ERP Integration combines the two systems, Magento and A2000, for a more accessible, state-of-the-art user experience.
For any trouble that you may have integrating these two systems, we’ve put together a helpful guide for you below. If you have any questions while going through this guide, please feel free to send us a message, or call our official line at 212-225-8883.
Go back to the Magento A2000 Integration page.
1. Preparation and Configuration
Under admin panel, go to System, then Configuration, and A2000 Integration.
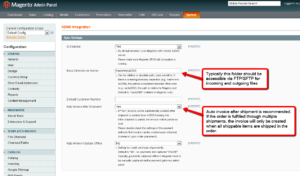
Under sync settings, you should select ‘Yes’ for ‘Is Enabled.’ For the base Directory on Server option, this folder should typically be accessible via FTP/SFTP for incoming and outgoing files.
Auto invoice after shipment is recommended. If the order is fulfilled through multiple shipments, the invoice will only be created when all shippable items are shipped in the order.
Please determine the shipping methods and payment methods to be used in Magento, so that the development team can create proper mapping between Magento and A2000.
Inventory
In addition to the default Magento SKU, each product should also have an A2000 UPC.

To update inventory, upload the inventory update file to the incoming folder via FTP/SFTP. Inventory update file should begin with “invent.”
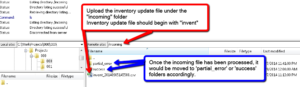
Upload the inventory update file under the “incoming” folder.
Once the incoming file has been processed, it would be moved to ‘partial_error’ or ‘success’ folders accordingly.
Please make sure the file name begins with “invent.”
Please see the attached sample file for details: invent_20140905145500.csv
Incoming logic can be trigger manually (TestIncoming.php script) or by CRON jobs.
3. Outgoing, Export Order
Order processing logic depends on “A2000 Sync Status”, as shown in the manage order panel:

By default all orders will be “Pending.”
Once the order has been exported into a CSV file for A2000, it will be marked as “Order Sent”. When the shipment/tracking file has been successfully imported, the corresponding order will be marked as “Tracking Received”.
Historical orders that should not be handled by A2000 can be marked as “Ignored”. It’s recommended to use the “TestSetAllOrdersAsIgnored.php” script to batch update all past order as “Ignored.”
Once the order is created, the export CSV file can be created manually (TestOutgoing.php script) or by CRON jobs. It’s located under the outgoing folder for the FTP/SFTP.
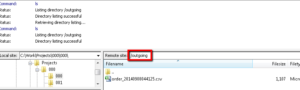
Please see the attached sample file for details: order_20140908044125.csv
4. Incoming, Shipment/Tracking
Similar to update inventory, upload the order status update file to the incoming folder via FTP/SFTP.

Please make sure the file name begins with “status.”
Please see the attached sample file for details: status_20140908185500.csv and status_20140909185500.csv
Incoming logic can be triggered manually (TestIncoming.php script) or by CRON jobs.
In this example, the Magento order #100008461 is fulfilled in 2 separate shipments:
1) status_20140908185500.csv ships part of the order with tracking code: TESTTRACKING1
2) status_20140909185500.csv ships part of the order with tracking code: TESTTRACKING2
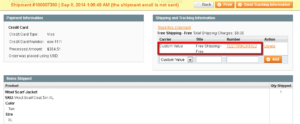
First, upload 1) status_20140908185500.csv, after incoming logic is triggered:

You can see the items ordered in the screenshot above. The order is partially shipped after the first shipment.
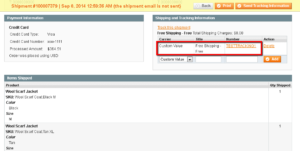
Upload 2) status_20140909185500.csv, after incoming logic is triggered:

When the shipment ships all items are in the order. Invoice can be created automatically.
Since all items in the order are shipped after this shipment, and we allow auto invoice after shipment via system config, this order has been invoiced automatically.
Need More Information? |